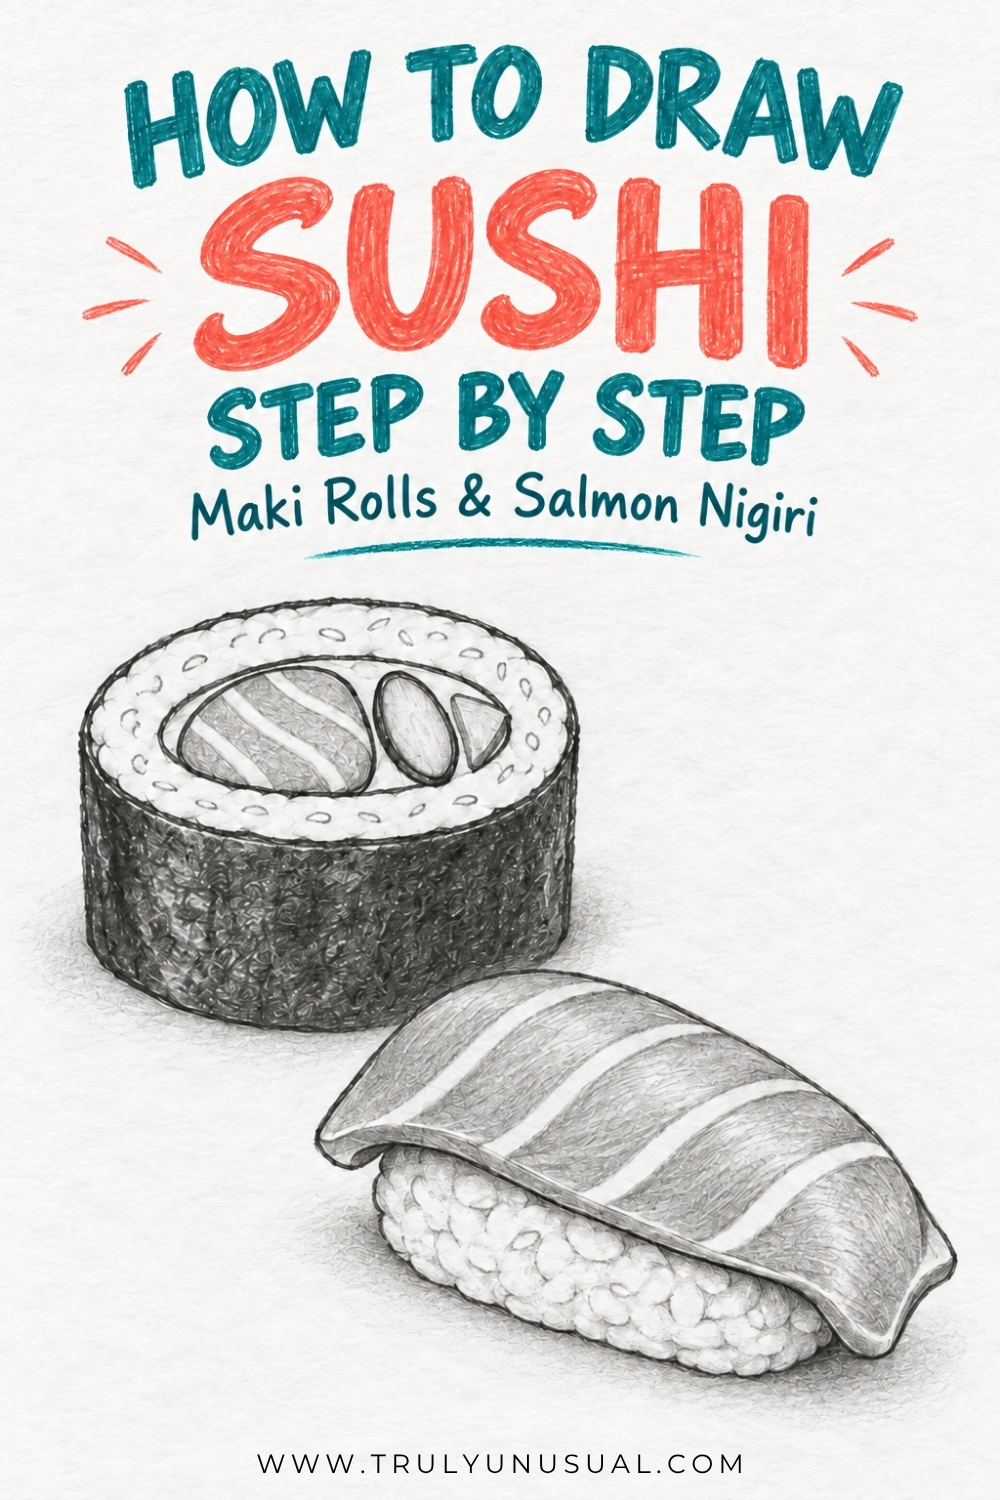
Sushi is a fun thing to sketch because a few basic shapes can turn into something instantly recognizable. A simple oval becomes a maki roll, while a rounded mound with a curved topping starts to look like salmon nigiri. The little details, such as the rice texture and pale stripes across the salmon, are what make the drawings come together.
In this guide, I’ll show you how to draw sushi step by step with two pencil tutorials. We’ll start with a maki roll filled with salmon, cucumber, and avocado, then try a piece of salmon nigiri. Each tutorial has six steps, with tips to help you shape the outlines, add the details, and build up the shading.
You only need a pencil, an eraser, and some paper to get started. Keep your early lines light so you can make changes as you go.
How To Draw Sushi: Step-By-Step Maki Sushi Roll Drawing Tutorial
These simple steps show you how to build a sushi drawing from a few simple shapes. Start lightly so you can adjust the outline before adding the filling and shading.
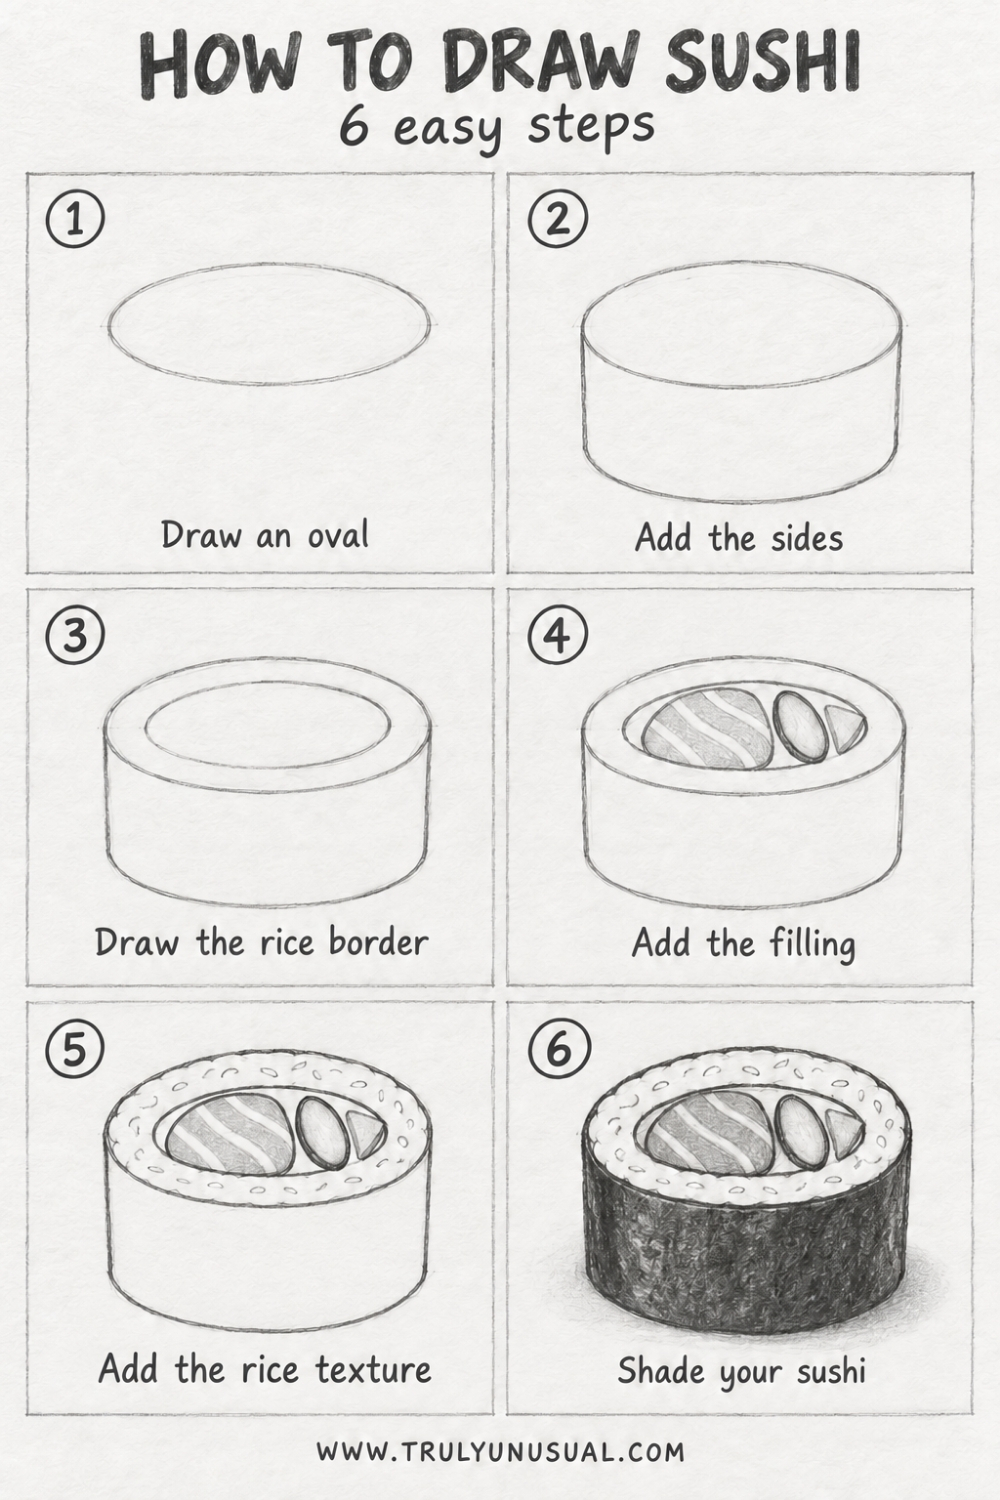
Step 1: Draw an oval
The first step is to sketch a wide oval for the top of the sushi. We’re looking at the roll slightly from above, so its round top appears oval from this angle.
Use loose pencil strokes to find the outer shape. If you struggle to keep it balanced, add a faint horizontal guide line through the center and erase it once you’re happy with the outline.
Step 2: Add the sides
Draw a short line downward from each side of the oval. Connect their lower ends with a long curved line that follows the rounded front edge above.
This creates the cylindrical shape of your maki roll. Keep the sides about the same height and soften the bottom corners so the sushi base looks rounded rather than boxy.
Step 3: Draw the rice border
Inside the top oval, draw a smaller oval at the same angle. Leave a fairly even space between the two outlines for the rice surrounding the filling.
Think of the front edges as parallel curves, with the smaller one following the larger one. This is an easy step to adjust, so take a moment to check that the center has enough room for your ingredients.
Step 4: Add the filling
Draw a rounded piece of salmon, a narrow cucumber oval, and a small avocado wedge inside the opening. Keep the ingredients close together, with each shape still easy to recognize.
For the salmon, add gently sloping wavy lines in pairs to suggest the pale bands running through the fish meat. Leave these bands white when you shade the surrounding areas.
This example includes raw fish, but you can change the filling to cucumber and avocado alone. For another variation, add a small cluster of fish eggs using tiny circles with a little space between them.
Step 5: Add the rice texture
Scatter little oval marks and small curves around the white rice border. Vary their direction and spacing to suggest rice grains without drawing every one individually.
A few small dots can fill the gaps, but leave plenty of white paper showing. The texture of the rice should stay light enough to stand out against the dark seaweed you’ll add next.
Keep the filling from the previous step unchanged and leave the sides of the roll blank for now.
Step 6: Shade your sushi
Shade the seaweed wrapper gradually with overlapping layers of pencil. Use short strokes that follow the rounded surface rather than strong horizontal lines running straight across it.
Leave a small highlight on one side to suggest light catching the wrapper. Keep the rice mostly white, then add a soft shadow underneath to give the sushi shape some weight.
If you want to add color, try warm colors such as peach and coral for the salmon, with green for the cucumber and avocado. A very pale touch of light yellow can add warmth to the rice, though most of it should remain white.
How To Draw Sushi: Step-By-Step Salmon Nigiri Drawing Tutorial
For this type of sushi, a slice of salmon rests over a small mound of rice. Unlike the previous example, there’s no seaweed wrapper, so the curved fish topping and exposed rice give the drawing its shape.
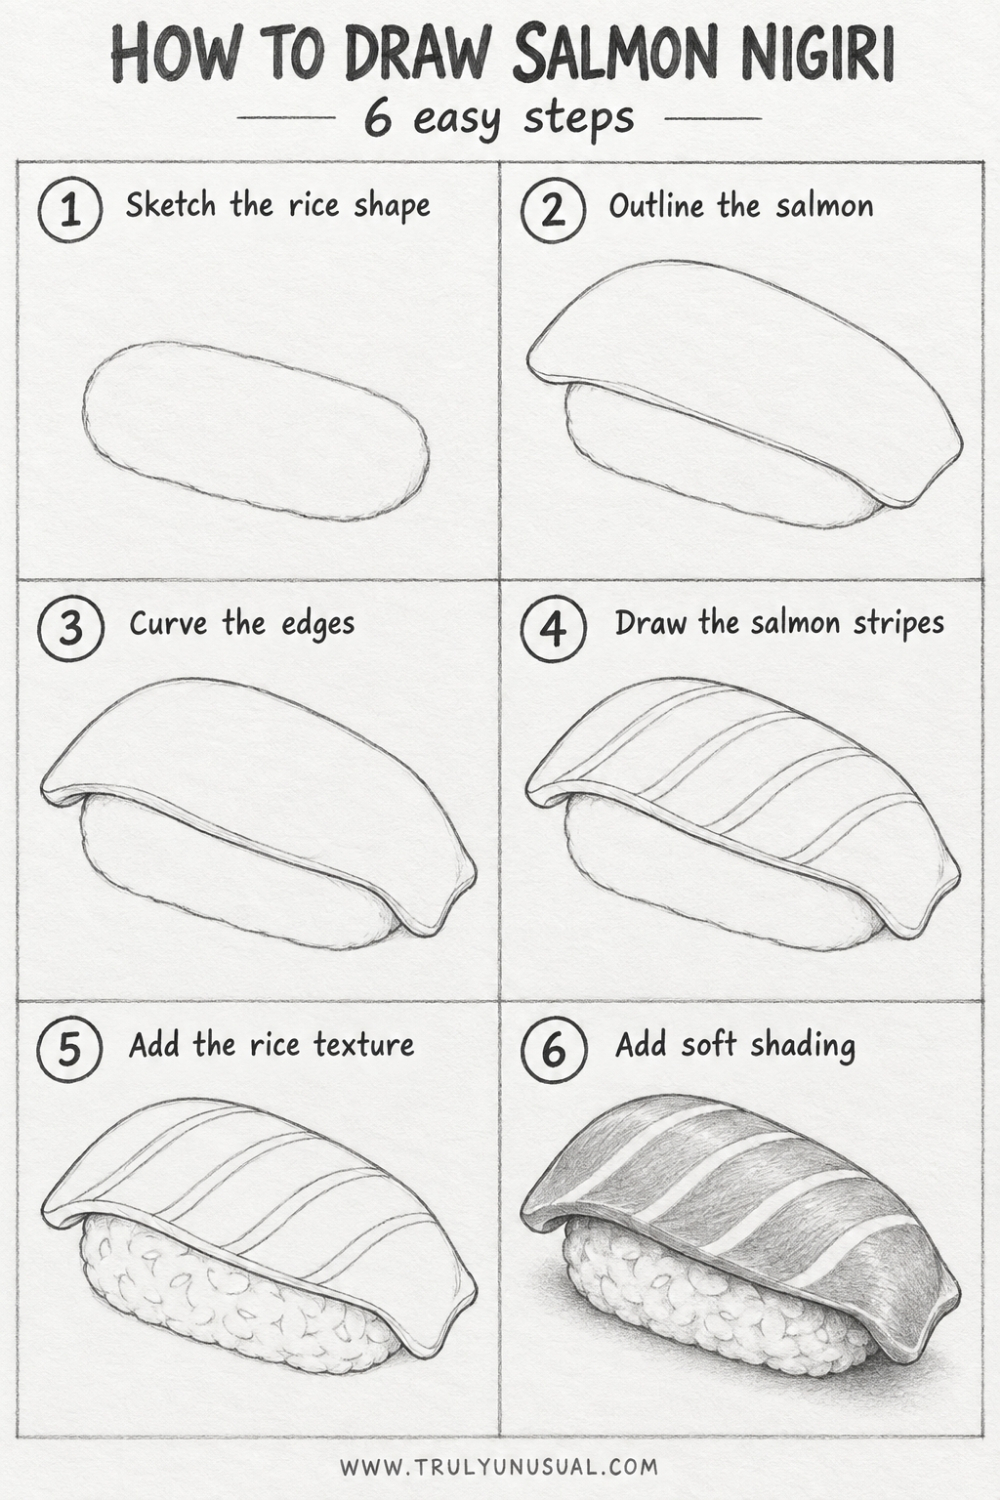
Step 1: Sketch the rice shape
Lightly draw a long, rounded mound that slopes slightly downward toward the right. Think of a soft little cushion rather than a straight rectangle.
Keep the ends rounded and the lower edge slightly uneven. Leave room above and beside the mound for the salmon to extend beyond it.
Step 2: Outline the salmon
Sketch a broad slice of salmon over the rice. Its upper edge arches gently, while the lower edge follows the mound beneath it.
Allow the fish to hang a little past both ends. Erase any parts of the rice outline that would be hidden underneath, keeping the visible front edge clear.
Step 3: Curve the edges
Round the ends of the salmon so they appear to drape over the rice. A slight downward bend at each end helps the slice look flexible.
Add a narrow second line beneath the front edge to show its thickness. Follow the shape you already have rather than making this edge perfectly straight.
Step 4: Draw the salmon stripes
Add several curved diagonal bands across the salmon. Draw two lines for each band, leaving a narrow strip between them that will stay pale.
Let the bands follow the rounded surface of the fish. Small differences in their width and spacing will make the pattern feel more natural.
Step 5: Add the rice texture
Draw loose oval shapes and curved marks across the exposed rice. Place some close together and let others disappear beneath the salmon, rather than arranging them in tidy rows.
Add a few rounded bumps along the lower outline to soften the original shape. You only need enough detail to suggest the surface, especially near the shaded area beneath the fish.
Step 6: Add soft shading
Lightly shade between the pale salmon bands, building the tone in gentle layers. Keep the upper surface lighter and deepen the shading beneath the drooping edges.
Add a narrow shadow where the fish overlaps the rice. A few faint shadows between the grains will give the mound depth without turning it solid gray.
Finish with a soft shadow beneath the nigiri. Once you’re comfortable with this version, you could try ebi nigiri by replacing the salmon with a curved cooked shrimp and letting a little shrimp tail extend beyond one end of the rice.
Once you’ve tried both sushi drawings, put them together on the same page. A couple of maki rolls beside a piece of salmon nigiri make a little sushi selection, and repeating the shapes is useful practice. You can also change the fillings or try drawing the pieces from a slightly different angle.
Take your time with the shading, especially where the salmon rests on the rice and around the dark seaweed wrapper. Those small changes in tone help the separate parts stand out. If you’d rather add color, keep the rice mostly white and use gentle shades of coral, green, and dark gray for the other ingredients.
I hope these tutorials have given you a clear starting point for drawing sushi. Keep your first attempts so you can look back at them, and leave room on the page for another piece.
Other drawing ideas and guides: How to draw a pickup truck | Cute and easy Halloween drawing ideas | Cute animal drawing ideas | Cute and easy Christmas drawing ideas.
Magdalena
If you enjoyed this post featuring an easy sushi drawing tutorial for beginners, pin it on Pinterest to come back to it whenever you want and help it reach more readers!